I have created a Unity Project that utilises the Unity Shader Engine to create the Glow, Hologram, Forcefield, Water and Particle effects
The Glow Effect
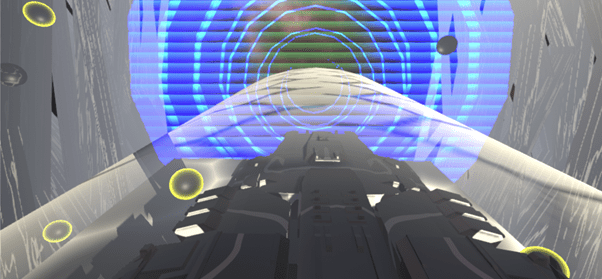
The first shader that I started with is the Glow Effect that will make an object`s outline glow and increase the border size to match the glowing, creating a highlight effect. As you can see in the final image of the project there are black balls with a yellow glow on their borders, which would be the highlight effect of the Glow Shader.
To create this shader, I needed a Fresnel Effect, which allowed me to change the edges of the object to make the highlight happen only in the edges and not anywhere else. Multiplied by a colour node with an HDR yellow mode allowed me to create the yellow effect, which can be changed to any colour, but I have chosen yellow. Then its applied to the albedo section of the master node as well as multiplied even further with a one minus node that contains a time node, allowing for the glow effect to change over time and not stay constant, which is then inputted into the Emission section of the master node
Finally, I have added a simple texture property that is a metallic smooth texture provided by the unity starter package when you start a project. This texture has then been added to the master node for the object to have a texture to create the effect that I wanted to achieve
The Hologram Effect
Afterwards I decided to go with the hologram shader effect, which required a lot of steps to get to the final product. First of all I had to get a constant change over time so I applied time with a vector value to decide the speed of the change, which was then combined with the screen position and another vector value in a tiling and offset node in order to create the hologram texture, to be able to change over time as well as fix its position depending on where the player is looking. To be able to see this change I used a sample texture node with a texture file I received from the workshop material of my lecturer. Now I had a simple hologram, that was connected to the alpha channel of the master node, now to make it more advanced I connected it to a one minus node to change the colour to negative of what it was, multiplied by another colour and added by another set of effects which all connected to the emission to create the hologram effect
The second set of effects was a random range timer combination multiplied by the Fresnel effect to produce the outline like the glow effect, in order to get the background blue for a space like theme, and the blue was added using a colour node in the HDR node with high intensity to highlight the edges of the circle as well as get brighter over time.
The Forcefield Effect
For the forcefield I started with a screen position node, that was split into a split node and only the alpha colour was taken into a subtract node with a vector value, and then again subtracted by the scene depth, in order for the forcefield effect to be visible through the object and not hide the object, which was then one minus-ed using the one minus node to create the opposite effect as the depth would actually hide the object, which was not what I wanted. Then the Fresnel effect added with the depth value, which was received by a smooth step, then all multiplied with a texture node to show the texture of the force field, for which I used the standard assets provided by unity when creating a project.
The Water effect (space)
After I finished with the glow, forcefield and hologram, I needed to create a theme and what came to my mind was space scene of a ship going through hyperspace. For this I needed space that constantly moved, like water. As a result, I decided to create the water shader
To create this shader, I used the time node multiplied by a vector node for the number of ripples per second. Combined into a Voronoi, which basically allows for ripples to be created and a vector value to set the number of ripples created, not to overload the shader. Then the output is placed in a power node with a vector value of a power, which would be how viscous the water is (how close together the ripples are), multiplied with a colour node to create the style of space water I wanted to create. Added more with a different colour to further add onto the style I wanted, all outputted into the albedo, to create the space water effect.
The Particle Effect
Finally, after I had the space water set in place with the other effects, I needed now to make the ship and the surrounding space look like space. As a result, I started to create a particle effect which dynamically changes over time circling an object to create moving through space effect.
For this I used a time node multiplied by vector value combined into a tiling and offset node, in order to create a change in the effect over time. The output is then combined into a simple noise with a vector value to determine the size of the particle effect, and the simple noise allows for the effect to be shown in a white space with black spaces where the colour should be. To get an even more intense and random change I decided to copy every node and add it together into a power node with a power value to create a more intense white noise. Then the value is Remapped to make the white and black more linear and more clear in order for us to see a clear effect, which is then inputted into a rectangle node in order to create lines inside each object in the shader effect, instead of a filled up space. Now its time to add the colour to create the space effect, and for that I used a multiply node, and then multiplied once more with a vertex colour node and then inputted into the albedo and alpha channels of the master node
