Be yourself; Everyone else is already taken.
— Oscar Wilde.
This is the first post on my new blog. I’m just getting this new blog going, so stay tuned for more. Subscribe below to get notified when I post new updates.
Be yourself; Everyone else is already taken.
— Oscar Wilde.
This is the first post on my new blog. I’m just getting this new blog going, so stay tuned for more. Subscribe below to get notified when I post new updates.
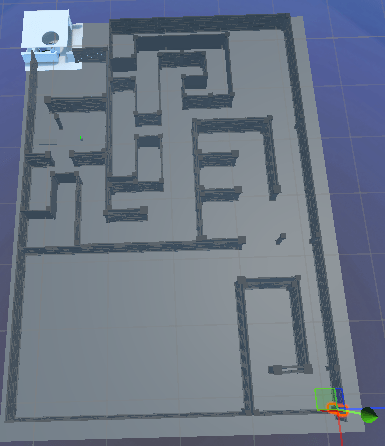
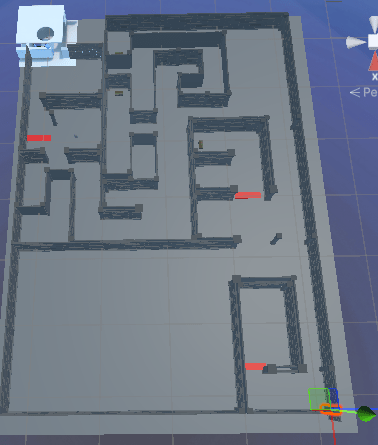
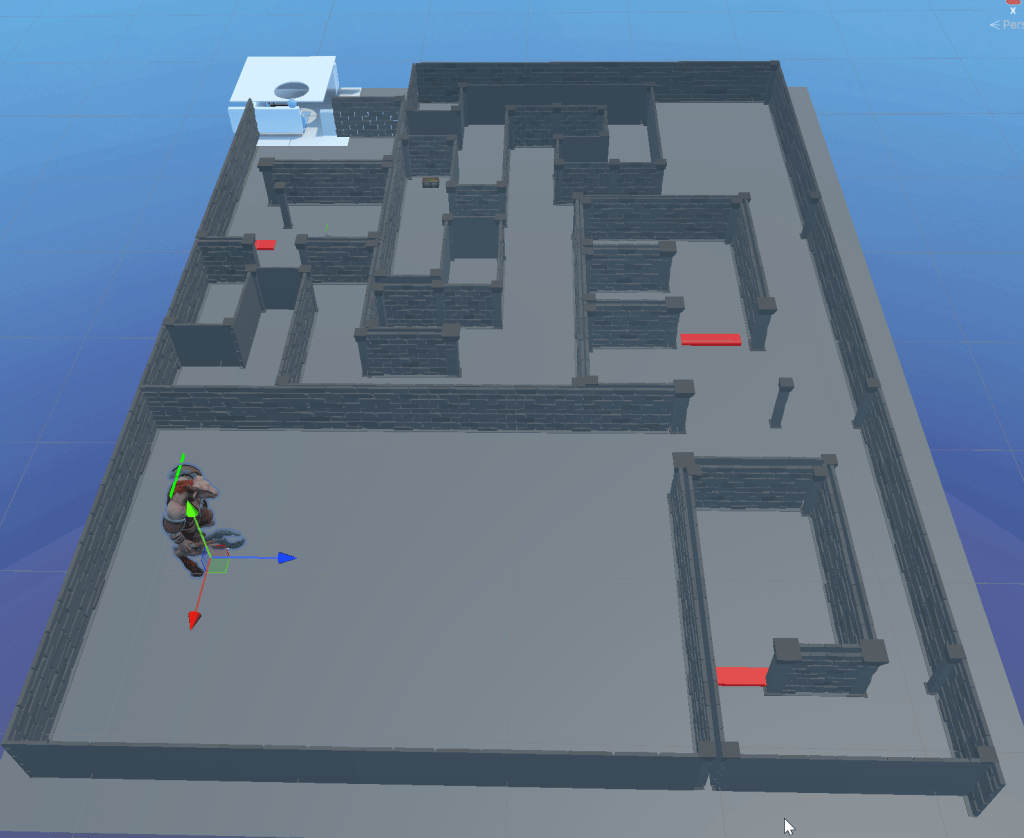
During these two weeks, I was away from my VR hardware, so I focused on improving the visual side of my project. My main goal was to make the game world feel more immersive and visually interesting by adding a variety of environment assets and props. Here’s what I accomplished:
I explored the Unity Asset Store and incorporated several high-quality, free and low-poly asset packs to build out my dungeon environment:
Each day, I added new assets and iteratively built up the scene. My process included:
Throughout these weeks, I took regular screenshots to document my progress. Each screenshot captures a new stage:
: https://assetstore.unity.com/packages/3d/environments/dungeons/n-gonforge-dungeon-low-poly-303819
: https://assetstore.unity.com/packages/3d/environments/dungeons/low-poly-dungeons-lite-177937
:https://assetstore.unity.com/packages/3d/props/animated-old-chest-20179
This week, I expanded my VR project by adding a bow and arrow mechanic inspired by a YouTube tutorial. The system lets the player use VR controllers to pull back a virtual bowstring, visually represented with a line renderer, and shoot arrows that respond to how far the string is drawn.
Handles the pulling action on the bowstring, updates the string’s position, and triggers events when the string is pulled or released.
namespace UnityEngine.XR.Interaction.Toolkit.Interactables
{
    public class XRPullInteractable : XRBaseInteractable
    {
        public event Action<float> PullActionReleased;
        public event Action<float> PullUpdated;
        public event Action PullStarted;
        public event Action PullEnded;

        [Header("Pull Settings")]
        [SerializeField] private Transform _startPoint;
        [SerializeField] private Transform _endPoint;
        [SerializeField] private GameObject _notchPoint;

        public float pullAmount { get; private set; } = 0f;

        private LineRenderer _lineRenderer;
        private IXRSelectInteractor _pullingInteractor = null;

        protected override void Awake()
        {
            base.Awake();
            _lineRenderer = GetComponent<LineRenderer>();
        }

        public void SetPullInteractor(SelectEnterEventArgs args)
        {
            _pullingInteractor = args.interactorObject;
            PullStarted?.Invoke();
        }

        public void Release()
        {
            PullActionReleased?.Invoke(pullAmount);
            PullEnded?.Invoke();
            _pullingInteractor = null;
            pullAmount = 0f;
            _notchPoint.transform.localPosition =
                new Vector3(_notchPoint.transform.localPosition.x, _notchPoint.transform.localPosition.y, 0f);
            UpdateStringAndNotch();
        }

        public override void ProcessInteractable(XRInteractionUpdateOrder.UpdatePhase updatePhase)
        {
            base.ProcessInteractable(updatePhase);
            if (updatePhase == XRInteractionUpdateOrder.UpdatePhase.Dynamic)
            {
                if (isSelected && _pullingInteractor != null)
                {
                    Vector3 pullPosition = _pullingInteractor.GetAttachTransform(this).position;
                    float previousPull = pullAmount;
                    pullAmount = CalculatePull(pullPosition);

                    if (previousPull > pullAmount)
                    {
                        PullUpdated?.Invoke(pullAmount);
                    }
                    UpdateStringAndNotch();
                    HandleHaptics();
                }
            }
        }

        protected override void OnSelectEntered(SelectEnterEventArgs args)
        {
            base.OnSelectEntered(args);
            SetPullInteractor(args);
        }

        private float CalculatePull(Vector3 pullPosition)
        {
            Vector3 pullDirection = pullPosition - _startPoint.position;
            Vector3 targetDirection = _endPoint.position - _startPoint.position;
            float maxLength = targetDirection.magnitude;

            targetDirection.Normalize();
            float pullValue = Vector3.Dot(pullDirection, targetDirection) / maxLength;
            return Mathf.Clamp(pullValue, 0, 1);
        }

        private void UpdateStringAndNotch()
        {
            Vector3 linePosition = Vector3.Lerp(_startPoint.localPosition, _endPoint.localPosition, pullAmount);
            _notchPoint.transform.localPosition = linePosition;
            _lineRenderer.SetPosition(1, linePosition);
        }

        private void HandleHaptics()
        {
            if (_pullingInteractor != null && _pullingInteractor is XRBaseInputInteractor controllerInteractor)
            {
                controllerInteractor.SendHapticImpulse(pullAmount, 0.1f);
            }
        }
    }
}Spawns an arrow at the notch point when the bow is grabbed and manages the arrow’s lifecycle.
public class ArrowSpawner : MonoBehaviour
{
    [SerializeField] private GameObject _arrowPrefab;
    [SerializeField] private GameObject _notchPoint;
    [SerializeField] private float spawnDelay = 1f;

    private XRGrabInteractable _bow;
    private XRPullInteractable _pullInteractable;
    private bool _arrowNotched = false;
    private GameObject _currentArrow = null;

    private void Start()
    {
        _bow = GetComponent<XRGrabInteractable>();
        _pullInteractable = GetComponent<XRPullInteractable>();

        if (_pullInteractable != null)
        {
            _pullInteractable.PullActionReleased += NotchEmpty;
        }
    }

    private void OnDestroy()
    {
        if (_pullInteractable != null)
        {
            _pullInteractable.PullActionReleased -= NotchEmpty;
        }
    }

    private void Update()
    {
        if (_bow.isSelected && !_arrowNotched)
        {
            _arrowNotched = true;
            StartCoroutine(DelayedSpawn());
        }

        if (!_bow.isSelected && _currentArrow != null)
        {
            Destroy(_currentArrow);
            NotchEmpty(1f);
        }
    }

    private void NotchEmpty(float value)
    {
        _arrowNotched = false;
        _currentArrow = null;
    }

    private IEnumerator DelayedSpawn()
    {
        yield return new WaitForSeconds(spawnDelay);

        _currentArrow = Instantiate(_arrowPrefab, _notchPoint.transform);

        ArrowLauncher launcher = _currentArrow.GetComponent<ArrowLauncher>();
        if (launcher != null && _pullInteractable != null)
        {
            launcher.Initialize(_pullInteractable);
        }
    }
}
Controls the arrow’s flight, applying force based on how far the string was pulled.
public class ArrowLauncher : MonoBehaviour
{
    [Header("Launch Settings")]
    [SerializeField] private float _speed = 10f;

    [Header("Visual Effects")]
    [SerializeField] private GameObject _trailSystem;

    private Rigidbody _rigidbody;
    private bool _inAir = false;
    private XRPullInteractable _pullInteractable;

    private void Awake()
    {
        InitializeComponents();
        SetPhysics(false);
    }

    private void InitializeComponents()
    {
        _rigidbody = GetComponent<Rigidbody>();
        if (_rigidbody == null)
        {
            Debug.LogError($"Rigidbody component not found on Arrow {gameObject.name}");
        }
    }

    public void Initialize(XRPullInteractable pullInteractable)
    {
        _pullInteractable = pullInteractable;
        _pullInteractable.PullActionReleased += Release;
    }

    private void OnDestroy()
    {
        if (_pullInteractable != null)
        {
            _pullInteractable.PullActionReleased -= Release;
        }
    }

    private void Release(float value)
    {
        if (_pullInteractable != null)
        {
            _pullInteractable.PullActionReleased -= Release;
        }

        gameObject.transform.parent = null;
        _inAir = true;
        SetPhysics(true);

        Vector3 force = transform.forward * value * _speed;
        _rigidbody.AddForce(force, ForceMode.Impulse);
        StartCoroutine(RotateWithVelocity());

        _trailSystem.SetActive(true);
    }

    private IEnumerator RotateWithVelocity()
    {
        yield return new WaitForFixedUpdate();
        while (_inAir)
        {
            if (_rigidbody != null && _rigidbody.linearVelocity.sqrMagnitude > 0.01f)
            {
                transform.rotation = Quaternion.LookRotation(_rigidbody.linearVelocity, transform.up);
            }
            yield return null;
        }
    }

    public void StopFlight()
    {
        _inAir = false;
        SetPhysics(false);
        _trailSystem.SetActive(false);
    }

    private void SetPhysics(bool usePhysics)
    {
        if (_rigidbody != null)
        {
            _rigidbody.useGravity = usePhysics;
            _rigidbody.isKinematic = !usePhysics;
        }
    }
}
Handles what happens when the arrow hits a surface—either sticking into it or triggering an effect.
public class ArrowImpactHandler : MonoBehaviour
{
    [Header("Impact Settings")]
    [SerializeField] private bool _explodeOnImpact = false;
    [SerializeField] private float _stickDuration = 3f;
    [SerializeField] private float _minEmbedDepth = 0.05f;
    [SerializeField] private float _maxEmbedDepth = 0.15f;
    [SerializeField] private LayerMask _ignoreLayers;
    [SerializeField] private Transform _tip;

    [Header("Visual Effects")]
    [SerializeField] private GameObject _impactGameObject;
    [SerializeField] private MeshRenderer _arrowMeshRenderer;

    private ArrowLauncher _arrowLauncher;
    private Rigidbody _rigidbody;
    private bool _hasHit = false;

    private void Awake()
    {
        _arrowLauncher = GetComponent<ArrowLauncher>();
        _rigidbody = GetComponent<Rigidbody>();
    }

    private void OnCollisionEnter(Collision collision)
    {
        if (_hasHit || ((1 << collision.gameObject.layer) & _ignoreLayers) != 0)
        {
            return;
        }

        _hasHit = true;
        _arrowLauncher.StopFlight();

        if (_explodeOnImpact)
        {
            HandleExplosion();
        }
        else
        {
            HandleStick(collision);
        }
    }

    private void HandleExplosion()
    {
        Debug.Log("Explosion Called");
        if (_arrowMeshRenderer != null)
        {
            _arrowMeshRenderer.enabled = false;
        }

        if (_impactGameObject != null)
        {
            Instantiate(_impactGameObject, transform.position, Quaternion.identity);
        }

        Destroy(gameObject);
    }

    private void HandleStick(Collision collision)
    {
        Vector3 arrowDirection = transform.forward;
        Vector3 arrowUp = transform.up;
        ContactPoint contact = collision.GetContact(0);

        float randomDepth = Random.Range(_minEmbedDepth, _maxEmbedDepth);
        Quaternion finalRotation = Quaternion.LookRotation(arrowDirection, arrowUp);
        Vector3 centerOffSet = _tip.localPosition;
        Vector3 finalPosition = contact.point - (finalRotation * centerOffSet) + contact.normal * -randomDepth;

        transform.SetPositionAndRotation(finalPosition, finalRotation);

        CreateJabPoint(collision, randomDepth);

        transform.SetParent(collision.transform, true);
        StartCoroutine(DespawnAfterDelay());
    }

    public ConfigurableJoint CreateJabPoint(Collision collision, float randomDepth)
    {
        var joint  = gameObject.AddComponent<ConfigurableJoint>();
        joint.connectedBody = collision.rigidbody;
        joint.xMotion = ConfigurableJointMotion.Limited;
        joint.yMotion = ConfigurableJointMotion.Locked;
        joint.zMotion = ConfigurableJointMotion.Locked;

        var limit = joint.linearLimit;
        limit.limit = randomDepth;
        joint.linearLimit = limit;

        return joint;
    }

    private IEnumerator DespawnAfterDelay()
    {
        yield return new WaitForSeconds(_stickDuration);
        Destroy(gameObject);
    }
}This bow and arrow system was adapted from a YouTube tutorial by Valem.
Next Steps:
I plan to add damage to enemies from arrows, improve arrow pickup and quiver mechanics, and add sound/particle effects for a more immersive experience.
: Valem, “VR Bow and Arrow in Unity – XR Interaction Toolkit Tutorial”, YouTube.
This week I made some big steps forward by adding enemies with health bars, a way to damage them, and a trap system that activates when the player steps on a pressure plate. Here’s a breakdown of what I built, how it works, and some snippets of the code I wrote.
I wanted my enemies to have visible health that goes down when they’re hit. To do this, I created an EnemyHealth script and attached a UI health bar to each enemy.
This script keeps track of the enemy’s health, updates the health bar, and destroys the enemy when their health reaches zero.
public class EnemyHealth : MonoBehaviour
{
    public float maxHealth = 100f;
    public Image healthFill; // Assign this to the fill part of the UI health bar
    float currentHealth;

    void Start()
    {
        currentHealth = maxHealth;
        UpdateHealthBar();
    }

    public void DamageTaken(float damage)
    {
        currentHealth -= damage;
        currentHealth = Mathf.Max(currentHealth, 0);
        UpdateHealthBar();

        if (currentHealth <= 0)
        {
            Destroy(gameObject); // Remove enemy from the scene
        }
    }

    void UpdateHealthBar()
    {
        healthFill.fillAmount = currentHealth / maxHealth;
    }
}
To actually deal damage, I made a WeaponDamage script. This script checks if the weapon hits something tagged as “Enemy” and, if so, calls the enemy’s DamageTaken method.
public class WeaponDamage : MonoBehaviour
{
    public string weaponType;
    public float damage;

    private void OnCollisionEnter(Collision collision)
    {
        if (collision.gameObject.CompareTag("Enemy"))
        {
            EnemyHealth enemy = collision.gameObject.GetComponent<EnemyHealth>();
            if (enemy != null)
            {
                enemy.DamageTaken(damage);
            }
        }
    }
}
To make the environment more interactive, I added a trap system where spikes shoot out when the player steps on a pressure plate.
This script makes the spikes move forward and destroys them after a set time.
public class SpikeScript : MonoBehaviour
{
    public float speed = 3f;
    public float lifetime = 5f;

    private void Start()
    {
        Destroy(gameObject, lifetime); // Destroy spike after 'lifetime' seconds
    }

    private void Update()
    {
        transform.position += Vector3.forward * speed * Time.deltaTime;
    }
}
This script spawns spikes when the player steps on the pressure plate.
public class TrapSystem : MonoBehaviour
{
    public GameObject trapPrefab;    // Assign your spike prefab here
    public Transform spawnPoint;     // Where the spikes will spawn
    public int trapCount = 3;        // How many spikes to spawn

    private void OnTriggerEnter(Collider other)
    {
        if (other.CompareTag("Player"))
        {
            for (int i = 0; i < trapCount; i++)
            {
                Vector3 offset = new Vector3(0, 0, i * 2f);
                Instantiate(trapPrefab, spawnPoint.position + offset, Quaternion.identity);
            }
        }
    }
}
This week’s progress made my VR world feel much more alive and interactive! If you want to see any specific code or have questions about how something works, let me know in the comments!
This week, I focused on adding a knife throwing mechanic to my Unity VR project. The goal was to let the player grab knives from their belt, throw them using VR controls, and have them stick to walls. Here’s how I approached the task and what I learned along the way.
I broke the system into several key components:
This script checks if the player presses the X key or the VR grab action. When triggered, it calls the method to grab and spawn a knife. This allows for easy testing on both PC and VR hardware.
public class KnifeDetection : MonoBehaviour
{
    public ThrowableKnife knife;
    public InputActionProperty grabAction;

    private void Update()
    {
        if (Input.GetKeyDown(KeyCode.X) || grabAction.action.WasPressedThisFrame())
        {
            knife.GrabKnife();
        }
    }
}
This class keeps track of how many knives the player has left. When the player grabs a knife, it instantiates a throwable knife prefab at the hand’s position and reduces the count. The belt knife model is shown or hidden based on remaining knives.
public class ThrowableKnife : MonoBehaviour
{
    public GameObject beltKnife, throwableKnifePrefab;
    public Transform handTransform;
    public int maxKnives = 6;
    private int knivesRemaining;

    private void Start()
    {
        knivesRemaining = maxKnives;
        UpdateKnifeBelt();
    }

    public void GrabKnife()
    {
        if (knivesRemaining > 0)
        {
            Instantiate(throwableKnifePrefab, handTransform.position, handTransform.rotation);
            knivesRemaining--;
            UpdateKnifeBelt();
        }
    }
    void UpdateKnifeBelt()
    {
        beltKnife.SetActive(knivesRemaining > 0);
    }
}
When a thrown knife collides with an object tagged “Wall,” it becomes kinematic, making it stick in place. This gives a satisfying effect of knives embedding into surfaces.
public class KnifeWallStick : MonoBehaviour
{
    private void OnCollisionEnter(Collision collision)
    {
        if (collision.gameObject.CompareTag("Wall"))
        {
            GetComponent<Rigidbody>().isKinematic = true;
        }
    }
}
This script manages the total number of knives in the scene. It spawns new knives if under the max limit and removes them when needed.
public class AmmoManager : MonoBehaviour
{
    public GameObject daggerPrefab;
    public int maxKnifeAmmo = 6;
    private List<GameObject> knifeAmmoList = new List<GameObject>();

    public void SpawnAmmo(Vector3 position)
    {
        if (knifeAmmoList.Count < maxKnifeAmmo)
        {
            GameObject ammo = Instantiate(daggerPrefab, position, Quaternion.identity);
            knifeAmmoList.Add(ammo);
        }
        else
        {
            Debug.Log("No ammo");
        }
    }
    public void RemoveAmmo(GameObject ammo)
    {
        knifeAmmoList.Remove(ammo);
        Destroy(ammo);
    }
}
This week’s work laid the foundation for interactive weapon mechanics in my VR project. Next, I’ll refine the throwing experience and add more feedback to make it even more immersive.
This week marks the official start of my VR project for university, and I’m excited to document my journey! I’m using Unity 6.0, which is the latest version, so there are lots of new features to explore. To get started, I downloaded and installed the Unity VR sample project package. This sample is really helpful because it comes with the basic VR setup, including movement, hand controllers, and interaction scripts. It saved me a lot of time compared to building everything from scratch.
After installing the sample project, I spent some time exploring the project structure. I made sure the XR Plug-in Management was enabled and checked that my VR headset (Meta Quest 3) was being recognized by Unity. I had to update my headset’s firmware and install the latest drivers, which took a bit longer than I expected, but everything worked in the end!
With the base project running, I started thinking about what assets I would need. Since my project will involve interacting with objects—specifically weapons—I needed some 3D models to use as placeholders. I didn’t want to spend too much time modeling at this stage, so I headed to the Unity Asset Store to look for free options.
After some searching, I found the Free Low Poly Weapons Pack – Fantasy Dream (Unity Asset Store, ID: 320869). This pack includes a variety of stylized weapons, which is perfect for prototyping gameplay. Even though I’ll eventually replace these with custom models, they’re great for testing out mechanics and making the scene feel more alive.
Asset Reference:
Free Low Poly Weapons Pack – Fantasy Dream (Unity Asset Store, ID: 320869)
Importing the weapon pack into Unity was straightforward. I dragged the asset package into my project, and all the models appeared in the Assets folder. I then created a simple test scene where I could drop in a few weapons and try interacting with them using the VR controllers. The models are low-poly, so they load quickly and don’t slow down my project, which is ideal for early development.
I assigned one of the swords to the right-hand controller using the sample project’s grab system. It was really satisfying to see the weapon appear in my hand in VR! There were a few hiccups—like the weapon not aligning perfectly with my controller—but I managed to fix this by adjusting the model’s transform settings in Unity.
So far, working with Unity 6.0 and VR has been a good learning experience. The sample project made it easier to get started, but I still had to troubleshoot some issues with controller tracking and asset alignment. I also realized how important it is to use placeholder assets in the early stages, so I can focus on gameplay without getting stuck on visuals.
For next week, my plan is to:
I’m excited to keep building and see how my project evolves!
Reference:
Free Low Poly Weapons Pack – Fantasy Dream. Unity Asset Store. https://assetstore.unity.com/packages/p/free-low-poly-weapons-pack-fantasy-dream-320869
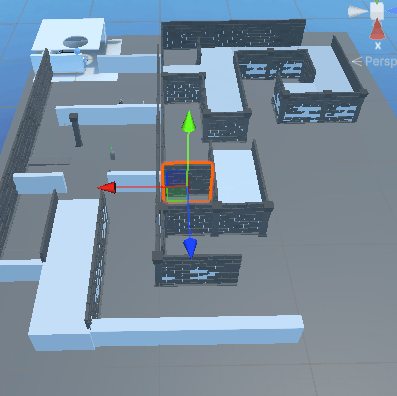
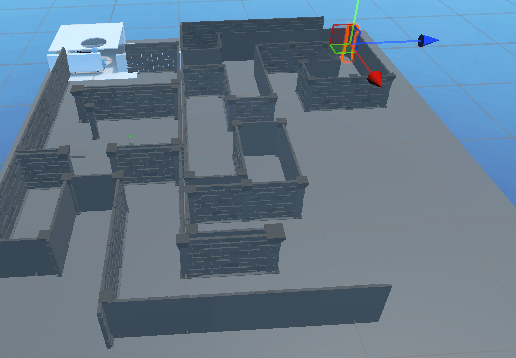
This final blog post documents the critical phase of integrating the designer’s map into our project and overcoming significant technical challenges in the process.
After receiving the map from the designers on 04/05/2025, I discovered they had been working with an outdated version of our Unity project. This created a severe version conflict – when I integrated their map, all my previously created animations were deleted from the project.
When the map integration caused major project issues due to version conflicts, I was able to recover my work by leveraging my other laptop, which still had the last stable version of the project. Since this laptop had not been updated with the problematic changes, I was able to copy the necessary files-such as animation controllers, prefabs, and scripts-directly from it.
This approach aligns with Unity community best practices for project recovery: always keep a full backup of your project on a separate device or drive, especially before major updates or integrations. By opening the backup project on my backup laptop, I could export the required assets and then re-import them into the main project, minimizing data loss and speeding up the restoration process.
Several critical issues required immediate attention:
I’ve begun creating video documentation of our project’s functionality, capturing the current state with plans to update as we finalize features. This serves both as course documentation and potential portfolio material.
This challenging integration process emphasized the critical importance of:
Asset Selection
From the 8 provided enemy assets, I selected the Character Pack: Zombie Sample due to its rigged model and attack/movement animations.
I synchronized the enemy’s NavMeshAgent with its Animator using a state-based approach:

Key Features:
MoveSpeed parameter controls walk/run blend treesanimator.SetTrigger("Die") when health ≤ 0Asset Integration
For the boss, I used the Minotaur 01 asset. Despite its complex animation controller, I streamlined it to focus on:
On 04/05/2025, a PC crash corrupted critical scene files. To recover:
Final Note: While the late map delivery (04/05/2025) created scope challenges, core combat and progression systems are fully functional. This project has significantly improved my skills in networked animation systems and crisis management during technical failures.
This week, I focused on integrating new character and weapon assets provided by the designers. I received four different character asset links and selected the FREE Low Poly Human – RPG Character from the Unity Asset Store for its compatibility, quality, and included rig. Although this package included an animation controller, it did not fit the needs of our gameplay mechanics, so I created a custom animation controller.
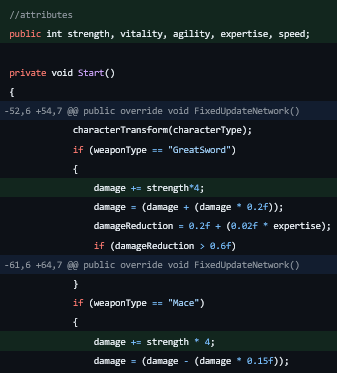
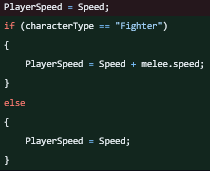
The new controller features labeled states for movement, one-handed and two-handed melee attacks, blocking, gathering, taking damage, and death. I adjusted the movement code to update the animator parameters in real time, ensuring smooth transitions between idle, walking, and attack animations:

For weapons, I was provided with eight assets covering both modern and medieval styles. I selected the Low Poly AR Weapon Pack 1 for modern firearms and the Low Poly RPG Fantasy Weapons Lite for melee options. To handle weapon switching, I implemented a function that activates the correct weapon model based on the equipped type:
This approach ensures that only the selected weapon is visible and interactable, supporting both melee and ranged gameplay.

Despite the wide variety of asset styles (medieval, modern, sci-fi), I prioritized assets with complete rigs and animations to maintain gameplay quality. Creating a custom animation controller allowed for precise control over gameplay states and smoother integration of new assets.
Networked Stat Architecture
Key Features:

Challenge:
I received over 20 asset links from the designers, including a wide mix of styles-medieval, modern, and sci-fi weapons and characters. This presented a significant challenge in maintaining a consistent visual and thematic style for the game.
Solution:
Melee Character (Fighter)
Ranged Character (Gunner)
Network Optimization: